Build your own aquarium
by Tim Gautrey Here is a project for the beginner to tackle that will test your DIY skills, stretch your abilities a little and get you used to doing basic things like cutting straight lines, square corners and making inset joints!The project I am going to outline here is to build your own aquarium and stand. It will be split into two parts, first the stand and next month, the tank itself.
For those of you who might want to cheat and buy a tank, the sizes are not going to be standard on purpose, so if you follow this project to the letter, (and it would be a good idea if you are not fully confident about what you doing), you’ll have to wait till next month to get it finished!
I would anticipate that the stand will take around a week to complete anyway, so you won’t have to wait too long to complete the project anyway! You will end up with a fantastic aquarium, large enough to be easily maintained and one that you can be proud of.
Here’s the outline
The stand will be constructed of timber and contain a cupboard under the shelf to store all the bits and pieces, air pump, filter, if you use a canister filter for the tank, and all the nets, foods and meds.
The tank itself will be 62 gallons imperial, 75 gallons US. This is about the best size to have, as it will accommodate the majority of fish with ease. I would imagine that many members will be looking at this one with interest!
Part 1: The stand
Tools you will need:
Hand saw, Tennon Saw, Hammer, Cross-head screwdriver, Flat blade screwdriver, Tape measure, Pencil, Set Square, Spirit Level, Electric drill, Assorted drill bits, Chisel, Sharp knife
Materials:
4” x 2” planed timber, 2” x 1” planed timber, ½” x ½” trim, 15mm Plywood or flooring grade chipboard, 9mm Plywood, 6mm plywood, 2 packs of tongue and groove cladding, 3” architrave, 4” woodscrews, 2” woodscrews, ¾” panel pins, Corner blocks, Cabinet hinges, Spring catches, Knobs/handles, ¾” self tapping screws, Wood glue, Sand paper,
The design:
The overall size of the cabinet will be 49” long, 20” deep and 28” high.
Here is the cabinet plan: (Carcase view without doors/sides)
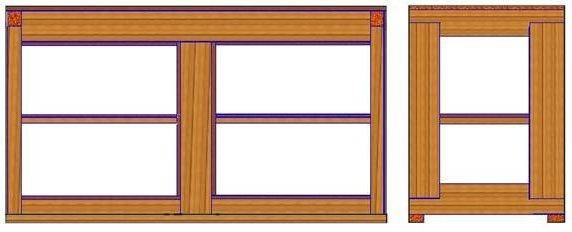
This drawing has a lot of detail in, to give you an idea very early on about how we are going to make it. You will notice the cuts on the top corners straight away and the way the ends are made to build in strength. Doing the corners this way has several advantages, mainly there is no need for diagonal bracing, which always causes problems, and the corners are very strong as will be explained in more detail further down.
Here’s what we do
First make the cutting list. If you are going to deviate from the project in size, this is where you have to make adjustments. If not, then the list I build here will save you time.
IMPORTANT POINT.
The cutting sizes are crucial, and one piece that is too long or too short could cause the stand to fail. It is going to support a very large fish tank and 300 kilograms, 1/3 of a ton of water! If you are going to deviate, make sure that any changes you make are correct!
Ok, let’s make a start. You need to cut the 4x2 first. Although I call it 4x2, it’s not actually, because that’s the rough cut size, not the planed size! The actual dimensions of my 4x2 are 3 ¾” x 1 ¾”. This is important, since it will affect the finished result, so please double check the size of your timber before you start cutting! This point mentioned, here we go:
We need:
2 x 46 ½” front and back top supports. 4 x 22 ½” corner uprights. 2 x 22 ¾” centre supports front and back. 4 x 19 ¾” top and bottom side supports. 2 x 16 ¼” top supports equally spaced under the top along the front and back supports (Not shown). 1 x 16 ¼ Middle baseline support (Not shown).
I don’t need to tell you that these cuts MUST be accurate and square, do I? Most of the joints are simple butt joins, and they rely on the screws and glue to take the weight, so they need to be clean and square to give maximum contact.
Let’s get the rest of the cutting out of the way. Next we take the 2x1, which is actually 1 ¾ x ¾ to be difficult! (Again, check your size).
We need:
2 x 46 ½ Middle shelf front and back supports, 2 x 48 ½ Base supports, 2 x 12 ¾ Middle shelf side supports, 4 x 19 ½ Front and back baseline bars, 2 x 19 Bottom shelf side supports,
Plywood cutting list:
48 ½ x 26 ¼ x 6mm Back Panel, 16 ¼ x 43 x 12mm Middle shelf, 19 x 43 x 12mm Bottom shelf, 20 x 49 x 15mm Top shelf,
Cladding cutting list:
Assuming you are using 6mm thick cladding at 4” overall width including the tongue, you will need to cut 12 lengths at 26 ¼” for the sides of the cabinet. This gives you plenty of adjustment so it should be fine.
Doors:
We are going to make the doors from scratch out of cladding and plywood, to fit snugly into the openings between the supports, to give you a nice flush finish on the front. For these doors we will need 2 pieces of 12mm plywood cut to 19 ½” x 20”, which will give a small clearance all round and 12 pieces of cladding cut at 21 ¼” to make them a nice tight fit. We will go into the door makeup later on, but while you have the saw in your hand, you may as well cut them!
That covers the timber cutting for this stand. Daunting, isn’t it! (Before you start wondering why I haven’t used all the timber yet, there are some pieces that will be cut later on, as we need them.)
Fine, all the bits of timber are now lying in nice neat piles on the workshop floor, all nicely cut with square ends. But that’s not what the picture shows, at least not on all of them. The top and bottom side supports need to be cut on the ends to recess them into the uprights. Let’s do that next, as this is a tricky bit of cutting and needs to be right.
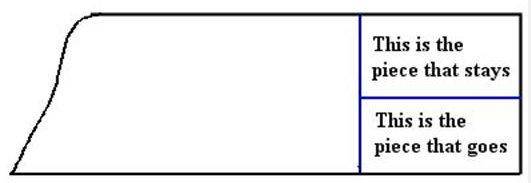
Take the first piece and measure 3 ¾” from the end. Mark a line with the set square across the width and down the sides with the pencil. Next, measure 2” from the side across the 4” width and mark a line from the end to the pencil line you just drew. Mark both sides the same. Now draw a line from side to side across the end, joining the two lines you just drew. You should now have something like this:
Using the tennon saw, very carefully cut out the smaller piece, staying just inside the pencil line. This takes a great deal of care and you might want to practice on some off-cuts first! The aim is to have a leg on the end that is 2” exactly by 3 ¾” long. This needs to be done on all 4 pieces on both ends. By the time you have finished, you should be able to do it easily! You could also chisel this piece out, if you feel more confident with that tool. (Brings back memories of the school woodwork classes!)
Now the pieces look right, we can start putting them together. First we need to lay out one side on the floor, placing all the pieces in their respective locations. I always do this, to make sure that everything fits!
So, take 2 of the side supports, 2 of the corner uprights and place them in a square so that they all fit snugly together. Now take your tape measure and check the overall dimensions. It should be 27 ¼” high and 19 ¾” wide, give or take a little. If it’s more than 1/8” different top to bottom or side to side, something’s wrong. But it’s not, and the measurements are perfect, they are sure to be, you’ve followed this project TO THE LETTER haven’t you?
Now, take your electric drill and a ¼” drill bit. Drill 2 holes through the leg of the top and bottom supports to take the screws as below:
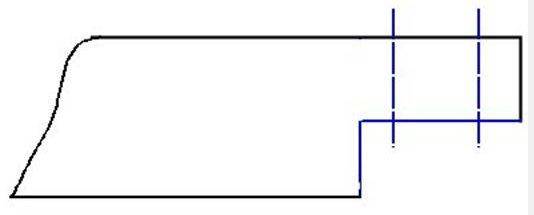
Repeat on all 4 legs, so that you can put 2 screws in each joint. Clean off any rough bits and apply wood glue liberally to the underside of the leg, position tightly onto the end of the upright and insert 2 4” woodscrews. Repeat on the other joints so you end up with a nice square frame. Do the same for the other end and lay one on top of the other to make sure they are both the same size. A tip here is to take the tape measure again and run it diagonally from corner to corner. If the frame is square and true, the measurement will be the same in both directions. It will be, won’t it? Any more than ¼” variation and you need to check the joints and cuts again! This is getting to be interesting, frustrating, annoying, depending on the results from the tape measure.
You should now have 2 end frames all made up and ready to move onto the next part of the build. So, we need to join them together to form a basic box, yes? Not yet. We have other things to do first! Put the sides off to one side, if you get my drift. We now focus our attention on the front and back supports, baseline supports and the centre support. It is easier to work on these now than trying to hold them in place when you are in three dimensions.
Take the top front and back supports. Measure and mark a line 1/3rd of the way from each end. Use the square and draw a line across the wide side. Drill two 1/3” holes on each line. This will fix the top supports under the top shelf later on, but it’s much easier to drill the holes now. Take the centre upright supports and mark a line ¾” from the bottom on the wide side. Again, drill 2 ¼” holes on this line, to fix the centre baseline support in place.
Place them out on the floor as you did with the side panels to form a sideways “H”. There are slight differences here since the baseline supports are smaller timbers than the rest. These should be laid down wide side to the floor, so that they come roughly half way up the centre support. Check the overall measurements with the tape and ensure that the top and bottom measurements match up. Fixing these pieces together requires the corner blocks. It’s easier to use these than trying to get screws into the timber at angles and it looks much tidier in the end too.
Screw the corner block onto the end of each baseline support, one end only where it meets the centre upright. Then screw the block to the upright itself. This needs to be done so that the joint is pulled tight and flush on the floor side. Mark a line midway along the top support to use as the centreline. Use 2 blocks to secure the top of the centre support to the top support, ensuring that the centre of the timber is on the centreline you just marked. Keep these blocks flush with the upper edge of the timber, or they will get in the way when we fit the doors! (You are looking at the inside of the frame now). It should look like this when you’re finished:

Make the two frames up exactly the same. These frames will be a little unstable for now, so don’t move them around too much.
Now it’s time to put the whole frame together. Take the two end frames and mark for fixings as below:
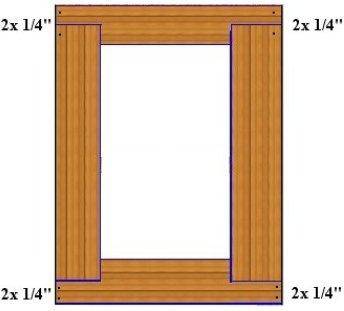
Note: The spacing of the holes top and bottom is different, since the timber is of different sizes.
Now comes the difficult part. You will need some help here, to hold the pieces together while you put the screws in. Start with the “H” frame on the floor and hold the end frame on its side against it. Glue and screw the two pieces together with 4 x 4” screws. Do the same on the other end and you will have three sides secure. Stand the unit up to fit the front “H” frame, remembering to have the flush joints on the outside, and secure this in place with glue and another 4 screws each end. The frame should be pretty stable now. Fix the cross supports into the top with another 4 screws and the baseline support from front to back on the bottom with another 4 screws. The frame has now taken shape and should start to look like the finished unit.
The shelves are next. The bottom shelf is the difficult one, since this needs to be cut around the centre uprights so that it fits tight right across the bottom.
The shelf fits flush at the back, but recessed on the front, to give the doors a solid edge to close onto. The centre cut-outs work out at 1 7/8 each side of the centre line, 1 ¾ in from the back, and 1” from the front. The panel should look like this when it’s done:

It might be an idea to give you a hint or two as to how to cut out the centre bits. I do this using an electric drill with a ½” drill bit, drilling a row of holes just inside the line and then snapping the piece out. Then with a chisel, I trim it back to the line and clean out the corners. You could also use a small hacksaw blade, drill a hole in the corner and cut the line this way. Finish here isn’t too important, but the tidier you can make it the better the finished effect will be.
Fit the bottom shelf side supports to the inside of the side frames, flushing them with the bottom edge with glue and 2” screws. These should fit tight between the rear and front baseline supports. Take the ½” x ½” trim and cut 2 lengths to fit along the front baseline bars on the inside, flush with the top of the baseline bar. This sounds complicated, but as you do it, it will make sense. These will support the front edge of the shelf. The reason I haven’t put these on the cutting list is because the length may vary according to the type of corner block you used to fix the baseline bar to the centre upright. You may need to make allowance for these blocks, so measure them to suit your unit. Use glue and 1” screws to fit these, making sure to drill 1/8” holes for the screws to avoid the wood trim splitting when the screw goes in.
With all the cut-outs done, and the shelf supports fitted, the shelf should just drop into the bottom of the unit, resting on the supports all round. If you want to fix this in place, you can do so using 1” screws into the battens underneath.
Middle shelf: This shelf can be fitted at any height you require, depending on where you put the shelf supports. I use corner blocks for this task.
Take the plywood and glue and screw the battens flush with the edges all round, wide-side to ply. This is just to strengthen the plywood so that it won’t bend under the weight of the equipment you put on there. Remember, it might have to support a canister filter!
Mark each upright at the height you want the shelf, less the thickness of the shelf complete with battens. On my unit, I want the shelf at 14” from the bottom shelf, so my marks would be 14 – 1 ¼ = 12 ¾ from the bottom shelf. This will be the top of the corner block, so you screw the corner block in place with the line level with the top of the block. I would fit one in each corner and one on each of the centre uprights, giving me six shelf supports. Drop the shelf into place. There should be no need to fix this, but if you want to give yourself a hernia, screw it in place from underneath through the blocks!
Top shelf
The easiest of them all to fit, it just drops onto the frame, overhanging each side and the back by ¼” and flush at the front. This shelf really needs to be screwed down, so drill holes all round and use 2” screws to secure it.
Fit the 6mm back panel next. This just glues and pins in place fitting under the top shelf and flush on all other edges. Don’t forget to glue and pin down the centre upright too, to save it pushing away when you load the shelves.
It is really taking shape now, and you’re almost finished. The sides are next. These are Tongue and groove cladding that you cut earlier. Take the first piece and trim off the tongue. This fits at the front. And flushes off with the corner upright. Trimming the tongue off will give you a nice finish where it shows. Glue and pin this piece in place, tight up against the top shelf. And flush with the front and bottom. Fit the next piece, slotting the tongue into the groove, glue and pin. Continue backwards until you get to the last one. This will need to be marked and cut to fit flush at the back. Repeat on the other side, and all of a sudden you have a cabinet, all finished except for the front and back base supports and doors!
Lay the unit on its back and screw the base supports along the front and back of the bottom. These will take up any variations in the floor, and it gives you a chance to raise or lower the unit when levelling it up for the tank. (You can get fingers under the ends of the unit to lift it like this, rather than having the whole base sitting on your carpet and having to struggle). I have kept them full length to distribute the weight over as large an area as possible.
While you still have the saw in your hands, cut the inside trim to retain the door out of the ½”x ½” trim, for the centre upright and top of each door opening, and glue and screw in place. Don’t forget that the door recesses into the front, so set them back by ¾”.
The doors
Making the doors is reasonably easy having got this far. Take the plywood panel and lay it down on the bench or floor. Take the first T&G panel and trim off the tongue, as before. Line this up so that the same amount overhangs top and bottom and it’s flush with the side. Glue and pin as before. Continue till you get to the last piece. Do not trim this yet! Leave it off for now. Fit 2 hinges to the flush side. Hold the door in place and secure the hinges in place with just one screw. Now you will find out if it fits or not. Sand the top/bottom to suit the opening until the door closes into the opening without fouling anywhere. When you’re happy with the fit, close the door and measure the distance between the T&G and the centre upright. Measure it top and bottom, as there might be a slight difference. Mark the last piece of T&G for the distance the tape told you, less ¼” for the Tongue and 1/8” for clearance. This can now be fitted to complete the door front. Do the same for the other side, remembering to reverse the panel as it will open the opposite way. Once the second door is complete, fit the knobs/handles and catches at a convenient height and the cabinet building is finished, nearly!
There is one more job to do, just to tidy the job up and make a really professional look to the finished unit. The architrave needs to be cut and mitred to fit at the top and bottom of the unit, to cover the screws, corners and rough edges.
Measure the front of the unit and cut the front section first. The measurement you take is the inside measurement of the mitre, not the full length. You can get lots of different tools to help you here, or free-hand it, like me. I would recommend that you get a mitre block at least, just to make sure. All the mitres are at 45 degrees. One of the easiest ways to get this right is to measure, cut 1” longer, make the first mitre cut, then offer the section up to the unit, line up the inside of the mitre with the one corner, then pencil a line the other end on the inside of the timber. This will give you a guide for the inner dimension and can be used as a cutting line for the other mitre.
Fit the top front trim. This can be fitted flush with the top of the shelf, or lifted ½” higher to give you a locating lip for the tank, either way works.
Measure the side and mark and cut the mitre on the one end only. The other end should be square cut. Fix this piece at the same height as the front section and then repeat for the other side.
If you want to, you can trim the bottom in the same fashion, making sure that it clears the door bottoms though.
All that is left now is to paint, stain or varnish your cabinet so it looks really good! You have 28 days to do this, assuming you went and got the materials on day one of release and it took you two days to put all this together! The tank building instructions will be in next month’s magazine!
While you’re waiting, you can put the cabinet stand in place and play about getting it nice and level using the spirit level in both directions. If you know what equipment you are going to use, you can also drill access holes in the back panel to accommodate these bits and pieces, fit the extension sockets and so on. This should keep you busy for another couple of days at least!