A DIY Aquarium Light Canopy
by Tim Gautrey
Important note
This article was reprinted with permissions given by the original article’s author. Bear in mind that information here is "as is" and potential references to "will be added in future" (or similar) might not be done by aqua-fish.net. However, we may update the article later.
Introduction
Here is a very simple and low-cost lighting canopy suitable for any straight fronted tank. It is designed to use common household materials and takes just a couple of hours to make.
Method
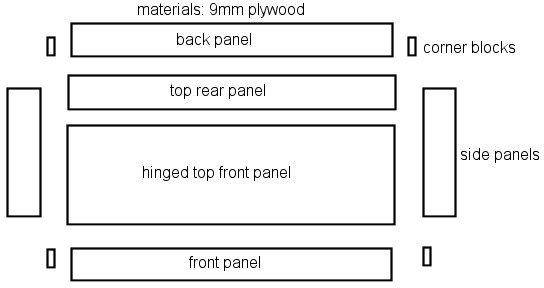
- Cut the back and front panels 20mm longer than the tank from x 200mm.
- Cut the side panels 5mm longer than the tank side x 200mm.
- Cut the corner blocks out of 2" x 2" planed timber into 150mm lengths.
- Screw/glue the corner blocks flush with the end and top of the side panels.
- Screw/glue the corner blocks onto the ends of the front/back panels, so that the side panel is flush with the end.
- This forms a basic box that sit over the tank and cover the top 2" of glass.
- Cut the top panels 10mm longer than the front/back dimension and 5mm wider than the overall side dimension.
- Glue/pin the top rear panel to the back top of the box, leaving a 5mm overhang each end, flush at the back using cabinet hinger, fix the front top panel to the rear top panel. This is the access flap.
- Paint the inside with gloss paint to protect it from condensation/water damage.
- When dry, mount two or three standard light fittings to the inside of the back panel as close to the top as possible. Wire these in parallel.
- Fit a switch anywhere you like on the outside of the box and wire the light sockets to it. Use silicone to seal the fittings and waterproof them.
- Decorate the outside of the canopy anyway you like, add a handle to the flap if you like, sit it over the tank and put the low evergy bulbs in.
- Plug it into the mains socket and switch on. One very simple lighting canopy.
Additional information
The top panel should be split roughly 1/3, 2/3 to make the access flap. You may wish to put a reinforcing batten on the inside front edge of the back section to take the screws for the hinges and similar on the back of the front section. This will give a better fixing for the screws and avoid any sharp points showing through.
I haven't mentioned wire/tubing access into the tank. This is simply a matter of cutting a slot in the back panel large enough for the wires/tubes to slide into as the lid slots onto the tank.
Another refinement for the lights is to use a 300 gramme coffee jar. When you fix the light fitting to the back panel, simply fix it through the lid of the jar, then when you have inserted the bulb, screw the jar over the top. It forms a really good waterproof cover for the lighting. There is no reason why a florescent light cannot be fitted instead, but this has been designed with bottom end cost in mind. If you have the lighting unit, just fit that outside the canopy and run the wires through for the tube ends, get some spring clips and screw them onto the back to hold the tube in place and it's done.
I didn't mention the way the wiring should run either. The best way is to drill holes through the back panel and run the wiring externally from fitting to fitting. It is easier to waterproof and much tidier. The switch can be a surface mounted light switch or an inline toggle switch similar to most table lamps. The latter is easier to fit, since it just runs straight from the first light.
If the canopy is very long, you may need to put some corner blocks along the back-to-top panel joint to ensure that it all stays secure. You may also need a reinforcing batten inside the front panel to avoid any warping.
The design is basic and can be adapted, altered and changed to suit almost any tank. It's up to the individual to work out what is best for their own use.
It is also possible to split the lid in half, making two access panels rather than one, but this is where the job gets more complicated, so that's something you can ask about if you want to make it work that way.